https://www.acmicpc.net/problem/2309


2309번: 일곱 난쟁이

아홉 개의 줄에 걸쳐 난쟁이들의 키가 주어진다. 주어지는 키는 100을 넘지 않는 자연수이며, 아홉 난쟁이의 키는 모두 다르며, 가능한 정답이 여러 가지인 경우에는 아무거나 출력한다.

www.acmicpc.net


코딩 테스트 준비를 위한 브루트 포스 문제 푸는 도중에 생긴 실수이다.


import java.util.Arrays;
import java.util.Scanner;

public class Main {
	public static void main(String[] args) {
		
		Scanner kb = new Scanner(System.in);
		int nan[] = new int[9];
		int sum = 0;
		
		for(int i=0;i <nan.length; i++) {
			nan[i] = kb.nextInt();
			sum += nan[i];
		}
		
		int minus = sum-100;
		
		for(int i=0; i<nan.length; i++) {
			for(int j=0; j<nan.length; j++) {
				if(i==j) {
					continue;
				}
				if(nan[i]+nan[j] == minus) {
					nan[i] = 0;
					nan[j] = 0;
					break;
				}
			}
		}
		Arrays.sort(nan);
		for(int i=2; i<nan.length; i++) {
			System.out.println(nan[i]);
		}
	}	
}

기존의 나의 코드이다.


1. 9명의 난쟁이들의 키를 담을 배열 과

난쟁이 들의 키를 합산할 변수를 선언한다.


2. 입력을 받음과 동시에 합산한 변수를 얻어낸다.


3. 문제에서 일곱 난쟁이들의 키의 합은 100이라고 주어졌으므로

합산결과에서 100을 뺀 변수를 저장


4. 중첩 반복문을 통해 i j 가 같을때는 넘어가게한다. 이때 i번째 값과 j번째 값의 합이

합산에서 100을 뺀 변수와 같다면 0으로 초기화 후 반복문을 탈출한다.


5. 정렬한다.


6. 인덱스 2번부터 출력한다.


예제입력 1

20 7 23 19 10 15 25 8 13 을 입력하면


출력에서 원하는 기대값을 얻을 수 있다.

하지만 제출해보니 틀렸다고 되어버린다.


이때 반례를 찾아보니 나의 잘못을 알게되었다.


만일 

7

8

10

13

19

20

23

11

12 가 주어진다고 하면


10 ,13 에서 반복문이 끝나야 한다. 하지만 끝나지않고 0으로 초기화 하고 반복문이 돌아버리면서

23을 만나며 23마저 0으로 초기화가 된다. 이 중첩 반복문 전체를 종료하지 않아서 생긴 문제이다.


이런 경우에 boolean 자료형을 써봐야 겠다고 생각하여

작성해보았는데 

		boolean finish = true;

		for(int i=0;finish==false; i++) {
			for(int j=0; j<nan.length; j++) {
				if(i==j) {
					continue;
				}
				if(nan[i]+nan[j] == minus) {
					nan[i] = 0;
					nan[j] = 0;
					finish = false;
					break;
				}
			}		
		}

finish 라는 변수를 두고 이 값이 안쪽에서 false로 만들어주고 이값이 false라면 종료하게끔 만들려고했는데

애초에 바깥쪽 반복문을 타지도 못하게되었다... 생각이 짧았네..ㅋㅋㅋㅋ


다른 방법이 있나 찾아보니 라벨을 붙여주는 방식도 있다는 것을 알게되었다.

Loop1:
		for(int i=0;i<nan.length; i++) {
			Loop2:
			for(int j=0; j<nan.length; j++) {
				if(i==j) {
					continue;
				}
				if(nan[i]+nan[j] == minus) {
					nan[i] = 0;
					nan[j] = 0;
					break Loop1;
				}
			}		
		}


		boolean finish = false;
		
		for(int i=0;finish==false; i++) {
			for(int j=0; j<nan.length; j++) {
				if(i==j) {
					continue;
				}
				if(nan[i]+nan[j] == minus) {
					nan[i] = 0;
					nan[j] = 0;
					finish = true;
					break;
				}
			}		
		}

불린 형식데이터를 자주 써보며 항상 좋고 이쁜코드를 짜고싶다 !!

반복문의 조건을 항상 멈출때에 초점을 맞추다보니 이런 실수가 생겼다.

더 성장하여 좋은 개발자가 되고싶다.

이번에는 롬복과 최신 트렌드에 대하여 공부해보았다.


의존관계 주입을 자동으로 해줄 때 생성자 주입이 좋긴한데 코드가 많다

최근에는 롬복이란 라이브러리와 함께 사용한다.


막상 개발을 해보면, 대부분이 다 불변이고, 그래서 생성자에 final 키워드를 사용하게 된다.

그런데 생성자도 만들어야 하고, 주입 받은 값을 대입하는 코드도 만들어야 하고 

필드주입처럼 좀 편리하게 사용하는 방법은 없을까?

이런 고민에서 시작되었다 


package hello.core.order;

import hello.core.discount.DiscountPolicy;
import hello.core.member.Member;
import hello.core.member.MemberRepository;
import hello.core.member.MemoryMemberRepository;
import org.springframework.beans.factory.annotation.Autowired;
import org.springframework.stereotype.Component;

@Component

public class OrderServiceImpl implements OrderService{

    private final MemberRepository memberRepository;
    private final DiscountPolicy discountPolicy;

    @Autowired
    public OrderServiceImpl(MemberRepository memberRepository, DiscountPolicy discountPolicy) {
        this.memberRepository = memberRepository;
        this.discountPolicy = discountPolicy;
    }

    @Override
    public Order createOrder(Long memberId, String itemName, int itemPrice) {
        Member member = memberRepository.findById(memberId);
        int discountPrice = discountPolicy.discount(member, itemPrice);

        return new Order(memberId, itemName, itemPrice, discountPrice);
    }

    //Test
    public MemberRepository getMemberRepository() {
        return memberRepository;
    }
}

이전 코드이다.


package hello.core.order;

import hello.core.discount.DiscountPolicy;
import hello.core.member.Member;
import hello.core.member.MemberRepository;
import hello.core.member.MemoryMemberRepository;
import lombok.RequiredArgsConstructor;
import org.springframework.beans.factory.annotation.Autowired;
import org.springframework.stereotype.Component;

@Component
@RequiredArgsConstructor
public class OrderServiceImpl implements OrderService{

    private final MemberRepository memberRepository;
    private final DiscountPolicy discountPolicy;

    @Override
    public Order createOrder(Long memberId, String itemName, int itemPrice) {
        Member member = memberRepository.findById(memberId);
        int discountPrice = discountPolicy.discount(member, itemPrice);

        return new Order(memberId, itemName, itemPrice, discountPrice);
    }

    //Test
    public MemberRepository getMemberRepository() {
        return memberRepository;
    }
}

롬복 적용후 코드이다.


코드가 매우 간단해졌다.

롬복 라이브러리가 제공하는 @RequiredArgsConstructor 기능을 사용하면 final이 붙은 필드를 모아서

생성자를 자동으로 만들어 준다.


위의 두 코드는 완전히 동일하다. 롬복이 자바의 애노테이션 프로세서라는 기능을 이용하여 컴파일 시점에

생성자 코드를 자동으로 생성해준다. 


 최근에는 생성자를 딱 1개를 두고  @Autowired 를 생략하는 방법을 주로 사용한다. 여기에 Lombok 라이브러리의

 @RequiredArgsConstructor 를 사용하는 방법을 쓴다.

이번에는 생성자 주입을 권장하는지에 대한 이유에 대해 공부해보았다.


불변

- 대부분의 의존관계 주입은 한번 일어나면 애플리케이션 종료 시점까지 의존관계를 변경할 일이 없다

오히려 대부분의 의존관계는 애플리케이션 종료 전까지 변하면 안된다.

- 수정자 주입을 사용하면 setXxx 메서드를 public으로 열어두어야한다.

- 누군가 실수로 변경할 수 도 있고, 변경하면 안되는 메서드를 열어두는것은 좋은 방법이 아니다.

- 생성자 주입은 객체를 생성할 때 1번만 호출되므로 이후에 호출되는 일이 없다.


누락

- 프레임워크 없이 순수한 자바 코드를 단위 테스트 하는 경우가 많다.

OrderServicImpl만 테스트 한다고 하면 

- 만약에 수정자 의존관계를 쓴다고 가정하자

널포인터익셉션을 발생시킨다.

테스트를 짜는 입장에서는 의존관계가 뭐가 들어가는지 눈에 보이지 않기 때문에 실수가 일어나기 쉽다.

- 생성자 주입을 쓴다고 가정하자

컴파일 오류가 발생하며

테스트를 짜는 입장에서 의존관계를 바로 파악할 수 있다.


final

- 생성자 주입을 쓰게 되면 final 쓸 수 있다.

생성자에서만 값을 세팅할 수 있다. 나머지는 값을 수정할 수 가없게된다.

개발자가 실수로 생성자안에 코드를 누락한다고 하자, 그때 테스트코드에서 널포인터익셉션을 발생시킨다.

final을 쓴다면 컴파일러 오류를 통해 누락된것을 알려준다.


수정자 주입을 포함한 나머지 주입 방식은 모두 생성자 이후에 호출되므로, 필드에 final 키워드를 사용할 수 없다.


생성자 주입 방식을 선택하는 이유는 여러가지가 있디만, 프레임워크에 의존하지 않고 순수한 자바 언어의

특성을 잘 살리는 방법이다.


항상 생성자 주입을 선택하고 옵션이 필요하다면 수정자 주입을 선택하자. 필드 주입은 사용하지 말자!!

'웹프로그래밍 > Spring 핵심 원리' 카테고리의 다른 글

38. 조회 빈이 2개 이상 - 문제  (0) 2021.08.17
37. 롬복과 최신 트렌드  (0) 2021.08.16
35. 옵션 처리  (0) 2021.08.13
34. 다양한 의존관계 주입 방법  (0) 2021.08.12
34. 중복 등록과 충돌  (0) 2021.08.10

이번에는 옵션 처리에 대해서 공부해보았다.


예를 들어 주입할 스프링 빈이 없어도 동작해야 될 때가 있다.

그런데 @Autowired 만 사용하면 required 옵션의 기본값이 true로 되어 있어서 

자동 주입 대상이 없으면 오류가 발생한다.


package hello.core.autowired;

import hello.core.member.Member;
import org.junit.jupiter.api.Test;
import org.springframework.beans.factory.annotation.Autowired;
import org.springframework.context.ApplicationContext;
import org.springframework.context.annotation.AnnotationConfigApplicationContext;
import org.springframework.lang.Nullable;

import java.util.Optional;

public class AutoWiredTeset {

    @Test
    void AutoWiredOption(){
        ApplicationContext ac = new AnnotationConfigApplicationContext(TestBean.class);

    }

    static class TestBean{
        @Autowired(required = false)
        public void setNoBean1(Member noBean1){
            System.out.println("noBean1 = " + noBean1);
        }

        @Autowired
        public void setNoBean2(@Nullable Member noBean2){
            System.out.println("noBean2 = " + noBean2);
        }

        @Autowired
        public void setNoBean3(Optional<Member> noBean3){
            System.out.println("noBean3 = " + noBean3);
        }

    }
}

테스트 코드부터 작성해보았다.

콘솔로그만 보면


1.@Autowired(required=false) : 자동 주입할 대상이 없으면 수정자 메서드 자체가 호출이 안됨.

noBean1 출력자체가 안되었다.

의존관계가 없다면 메서드 자체가 호출이 안된다.


2. org.springframework.lang.@Nullable : 자동 주입할 대상이 없으면 null이 입력된다.

호출은 하고싶을때 

noBean2가 호출되는것을 볼 수 있다.

대신 null로 들어온다


3. Optinal<> : 자동 주입할 대상이 없으면 Optinal.empty가 입력된다.


Member는 스프링 빈이 아니다.


'웹프로그래밍 > Spring 핵심 원리' 카테고리의 다른 글

37. 롬복과 최신 트렌드  (0) 2021.08.16
36. 생성자 주입을 선택하라  (0) 2021.08.16
34. 다양한 의존관계 주입 방법  (0) 2021.08.12
34. 중복 등록과 충돌  (0) 2021.08.10
33. 필터  (0) 2021.08.10

의존관계 주입 방법에 대하여 알아보았다.


의존관계 주입은 크게 4가지 방법이 있다.

-생성자 주입

-수정자 주입(setter 주입)

-필드 주입

-일반 메서드 주입


먼저 생성자 주입이란?


이름 그대로 생성자를 통하여 의존관계를 주입 받는 방법이다.


지금까지 해온 방법이 생성자 주입이다.


특징으로는 

생성자 호출시점에 딱 1번만 호출되는 것이 보장된다.

딱 1번 호출된다는 것은 호출된 이후부터는 그다음부터는

값을 세팅못하게 막을 수 있다는 장점이 있다.


불변, 필수 의존관계에 사용한다.


생성자가 딱 1개만 있다면 @Autowired를 생략해도 자동 주입이 된다. 


수정자 주입이란?


setter라 불리는 필드의 값을 변경하는 수정자 메서드를 통하여 의존관계를 주입하는 방법이다.


특징으로는 

선택, 변경 가능성이 있는 의존관계에 사용한다.


자바빈 프로퍼티 규약의 수정자 메서드 방식을 사용하는 방법이다.


ex)

@Autowired

public void setMemberRepository(MemberRepository memberRepository) {

           this.memberRepository = memberRepository

}


@Autowired의 기본 동작은 주입 대상이 없으면 오류가 발생한다. 주입할 대상이 없어도 동작하게

하려면 @Autowired(required = false)로 지정하면 된다.


자바빈 프로퍼티, 자바에서는 과거부터 필드의 값을 직접 변경하지 않고, setXxx, getXxx 라는 메서드를

통해서 값을 읽거나 수정하는 규칙을 만들었는데, 그것이 자바빈 프로퍼티 규약이다.


필드 주입이란?


이름 그대로 필드에다가 값을 넣는것이다.

ex) @Autowired private MemberRepository memberRepository;

      @Autowired private DiscountPolicy discountPolicy;


특징으로는 

코드가 간결해서 많은 개발자들을 유혹하지만 외부에서 변경이 불가능하므로 테스트 하기 힘들다는 치명적인 단점이 있다.

DI 프레임워크가 없으면 아무것도 할 수 없다.

사용하지 말아야한다. 인텔리제이 !표시에도 추천하지 않는다고 문구를 준다.


일반 메서드 주입이란?


일반 메서드를 통해서 주입 받을 수 있다.


특징으로는

한번에 여러 필드를 주입 받을 수 있다.

일반적으로 잘 사용하지 않는다.


참고로 의존관계 자동 주입은 스프링 컨테이너가 관리하는 스프링 빈이어야 동작한다. 스프링 빈이

아닌 Member 같은 클래스에서 @Autowired 코드를 적용해도 아무 기능도 동작하지 않는다.

'웹프로그래밍 > Spring 핵심 원리' 카테고리의 다른 글

36. 생성자 주입을 선택하라  (0) 2021.08.16
35. 옵션 처리  (0) 2021.08.13
34. 중복 등록과 충돌  (0) 2021.08.10
33. 필터  (0) 2021.08.10
33. 탐색 위치와 기본 스캔 대상  (0) 2021.08.05

이번에는 중복 등록과 충돌에 대해 알아보았다.


컴포넌트 스캔에서 같은 빈 이름을 동록하면 어떻게 될까?


1. 자동 빈 등록 vs 자동 빈 등록

2. 수동 빈 등록 vs 자동 빈 등록


자동 빈 등록 vs 자동 빈 등록 시에

컴포넌트 스캔에 의해 자동으로 스프링 빈이 등록되는데, 그 이름이 같은 경우 스프링은 오류를 발생시킨다.


수동 빈 등록 vs 자동 빈 등록

만약 수동 빈 등록과 자동 빈 등록에서 빈 이름이 충돌시에 어떻게 될까?


package hello.core;

import hello.core.member.MemberRepository;
import hello.core.member.MemoryMemberRepository;
import org.springframework.context.annotation.Bean;
import org.springframework.context.annotation.ComponentScan;
import org.springframework.context.annotation.Configuration;
import org.springframework.context.annotation.FilterType;

@Configuration
@ComponentScan(
        excludeFilters = @ComponentScan.Filter(
                type = FilterType.ANNOTATION, classes = Configuration.class)
)
public class AutoAppConfig {

    @Bean(name = "memoryMemberRepository")
    MemberRepository memberRepository(){
        return new MemoryMemberRepository();
    }
}

AutoAppConfig에 

memoryMemberRepository를 등록해준다.

package hello.core.scan;

import hello.core.AutoAppConfig;
import hello.core.member.MemberService;
import org.assertj.core.api.Assertions;
import org.junit.jupiter.api.Test;
import org.springframework.context.annotation.AnnotationConfigApplicationContext;

import static org.assertj.core.api.Assertions.*;

public class AutoAppConfigTest {

    @Test
    void basicScan(){
        AnnotationConfigApplicationContext ac = new AnnotationConfigApplicationContext(AutoAppConfig.class);

        MemberService memberService= ac.getBean(MemberService.class);
        assertThat(memberService).isInstanceOf(MemberService.class);
    }
}

테스트코드를 돌려보면 테스트가 성공한다.


이 경우 수동 빈 등록이 우선권을 가진다.

수동 빈이 자동 빈을 오버라이딩 해버리며 문제를 해결한다.


수동 빈 등록시 

18:05:47.418 [main] DEBUG org.springframework.beans.factory.support.DefaultListableBeanFactory - Overriding bean definition for bean 'memoryMemberRepository' ... 

이런 로그가 남는다.


개발자가 의도적으로 이런 결과를 기대한다면, 자동 보다는 수동이 우선권을 가지는 것이 좋다.

현실은 개발자가 의도적으로 설정해서 이런 결과가 만들어지기 보다는 여러 설정이 꼬여서 이런 결과가 만들어지는 경우가

대부분이라고 한다.

그렇게되면 잡기 어려운 버그가 만들어진다. 

그래서 최근 스프링부트에서는 수동 빈 등록과 자동 빈 등록이 충돌나면 오류가 발생하도록 기본 값을 바꾸었다.


package hello.core;

import org.springframework.boot.SpringApplication;
import org.springframework.boot.autoconfigure.SpringBootApplication;

@SpringBootApplication
public class CoreApplication {

	public static void main(String[] args) {
		SpringApplication.run(CoreApplication.class, args);
	}

}

스프링 부트를 실행시켜보자


이렇게 친절한 오류를 발생시켜준다!!

이번에는 필터에 대해 알아보았다.


 includeFilters : 컴포넌트 스캔 대상을 추가로 지정한다.

excludeFilters : 컴포넌트 스캔에서 제외할 대상을 지정한다.


package hello.core.scan.filter;

import java.lang.annotation.*;

@Target(ElementType.TYPE)
@Retention(RetentionPolicy.RUNTIME)
@Documented
public @interface MyIncludeComponent {
}
package hello.core.scan.filter;

import java.lang.annotation.*;

@Target(ElementType.TYPE)
@Retention(RetentionPolicy.RUNTIME)
@Documented
public @interface MyExcludeComponent {
}

애너테이션 두개를 생성한다. 


package hello.core.scan.filter;

@MyIncludeComponent
public class BeanA {
}
package hello.core.scan.filter;

@MyExcludeComponent
public class BeanB {
}

BeanA ,BeanB 클래스를 생성하고 

BeanA 에는 MyIncludeComponent

BeanB 에는 MyExcludeComponent 애너테이션을 추가한다.


package hello.core.scan.filter;


import org.assertj.core.api.Assertions;
import org.junit.jupiter.api.Test;
import org.springframework.beans.factory.NoSuchBeanDefinitionException;
import org.springframework.context.ApplicationContext;
import org.springframework.context.annotation.AnnotationConfigApplicationContext;
import org.springframework.context.annotation.ComponentScan;
import org.springframework.context.annotation.Configuration;
import org.springframework.context.annotation.FilterType;

import static org.assertj.core.api.Assertions.*;
import static org.springframework.context.annotation.ComponentScan.*;

public class ComponentFilterAppConfigTest {

    @Test
    void filterScan(){
       ApplicationContext ac = new AnnotationConfigApplicationContext(ComponentFilterAppConfig.class);
        BeanA beanA = ac.getBean("beanA",BeanA.class);
        Assertions.assertThat(beanA).isNotNull();

        org.junit.jupiter.api.Assertions.assertThrows(
                NoSuchBeanDefinitionException.class,
                () -> ac.getBean("beanB",BeanB.class));
    }


    @Configuration
    @ComponentScan(includeFilters = @Filter(type = FilterType.ANNOTATION, classes = MyIncludeComponent.class),
                    excludeFilters = @Filter(type = FilterType.ANNOTATION, classes = MyExcludeComponent.class)
    )
    static class ComponentFilterAppConfig{

    }
}

ComponentFilterAppConfig 설정정보 클래스에 

@ComponentScan의 필터기능을 사용하여

includeFilters에 MyIncludeComponent 애너테이션을 추가하여 BeanA가 스프링 빈에 등록되고

excludeFilters에 MyExcludeComponent 애너테이션을 추가하여 BeanB는 스프링 빈에 등록되지 않는다.


FilterType 옵션


5가지 옵션이 있다.


ANNOTATION :  기본값, 애너테이션을 인식하여 동작

ASSIGNABLE_TYPE : 지정한 타입과 자식 타입을 인식하여 동작한다.

ASPECTJ : AspectJ패턴 사용

REGEX : 정규 표현식

CUSTOM : TypeFilter 라는 인터페이스를 구현해서 처리

탐색할 패키지의 시작 위치 지정


@ComponentScan 에서

basePackages = " "

에 시작 위치를 지정할 수 있다.


예를 들어 멤버 패키지만 탐색하고싶다면

@ComponentScan(
        basePackages = "hello.core.member",
        excludeFilters = @ComponentScan.Filter(
                type = FilterType.ANNOTATION, classes = Configuration.class)
)

이렇게 지정해준다.

이렇게되면 OrderServiceImpl 은 탐색대상에서 벗어났기때문에 

빈으로 등록이 되지 않는다.


모든 자바코드를 다 뒤지게되면 시간이 오래걸리기 때문에 이런 기능을 사용한다.


@ComponentScan(
        basePackages = "hello.core.member",
        basePackageClasses = AutoAppConfig.class,
        excludeFilters = @ComponentScan.Filter(
                type = FilterType.ANNOTATION, classes = Configuration.class)
)

basePackagesClasses 를 사용하면 지정한 클래스의 패키지를 탐색 시작 위치로 지정한다.


@ComponentScan(
        excludeFilters = @ComponentScan.Filter(
                type = FilterType.ANNOTATION, classes = Configuration.class)
)

아무것도 지정해주지 않는다면?


@ComponentScan이 붙은 클래스의 패키지가 시작 위치가 된다.


그렇기에 패키지 위치를 지정하지 않고, 설정 정보 클래스의 위치를 프로젝트 최상단에 두는 것을 권장한다고 한다.

최근 스프링 부트도 이 방법을 기본으로 제공한다.


예를들어 프로젝트 구조가 이렇게 되어있다면

com.hello

com.hello.service

com.hello.repository


com.hello 위치에 메인 설정 정보를 둔다.

그렇게 하면 com.hello를 포함한 하위는 모든 자동으로 컴포넌트 스캔의 대상이 된다.

메인 설정 정보는 프로젝트를 대표하는 정보이기 때문에 시작 루트 위치에 두는 것이 좋다고 한다.


스프링 부트를 사용하면 스프링 부트의 대표 시작 정보인 @SpringBootApplication를 이 프로젝트 시작 루트

위치에 두는 것이 관례이다.


컴포넌트 스캔 기본 대상


컴포넌트 스캔은 @Component 뿐만 아니라 다음과 같은 내용도 추가로 대상에 포함한다.


@Component : 컴포넌트 스캔에서 사용

@Controller : 스프링 MVC 컨트롤러에서 사용

@Service : 스프링 비즈니스 로직에서 사용

@Repository : 스프링 데이터 접근 계층에서 사용

@Configuration : 스프링 설정 정보에서 사용


사실 애너테이션에는 상속 관계라는 것이 없다. 그래서 이렇게 애너테이션이 특정 애너테이션을 들고 있는 것을

인식할 수 있는 것은 자바언어가 아닌 스프링이 지원하는 기능이다.


컴포넌트 스캔의 용도 뿐만 아니라 애너테이션이 있으면 부가 기능을 수행한다.


@Controller : 스프링 MVC 컨트롤러로 인식

@Repository : 스프링 데이터 접근 계층으로 인식하고, 데이터 계층의 예외를 스프링 예외로 변환해준다.

@Configuration : 스프링 설정 정보로 인식하고, 스프링 빈이 싱글톤을 유지하도록 추가 처리를 한다.

@Service :  사실 @Service는 특별한 처리를 하지 않는다. 대신 개발자들이 핵심 비즈니스 로직이 여기

있겟구나 하고 비즈니스 계층을 인식하는데 도움을 준다.


컴포넌트 스캔과 의존관계 자동 주입 


지금까지 스프링 빈을 등록할때는 자바코드의 @Bean 이나 XML의 <bean> 등을 통해서 설정 정보에 직접

등록할 스프링 빈을 나열했다.


예제에서는 몇개가 안되었지만, 이렇게 등록할 스프링 빈이 많아지면 귀찮고, 설정 정보도 커지고, 누락할 

가능성도 발생하게 된다. 


그래서 스프링은 설정 정보가 없어도 자동으로 스프링 빈을 등록하는 컴포넌트 스캔이라는 기능을 제공한다.


의존과계 주입도 자동으로 해주는  @Autowired라는 기능을 제공한다.

package hello.core;

import org.springframework.context.annotation.ComponentScan;
import org.springframework.context.annotation.Configuration;
import org.springframework.context.annotation.FilterType;

@Configuration
@ComponentScan(
        excludeFilters = @ComponentScan.Filter(
                type = FilterType.ANNOTATION, classes = Configuration.class)
)
public class AutoAppConfig {

}

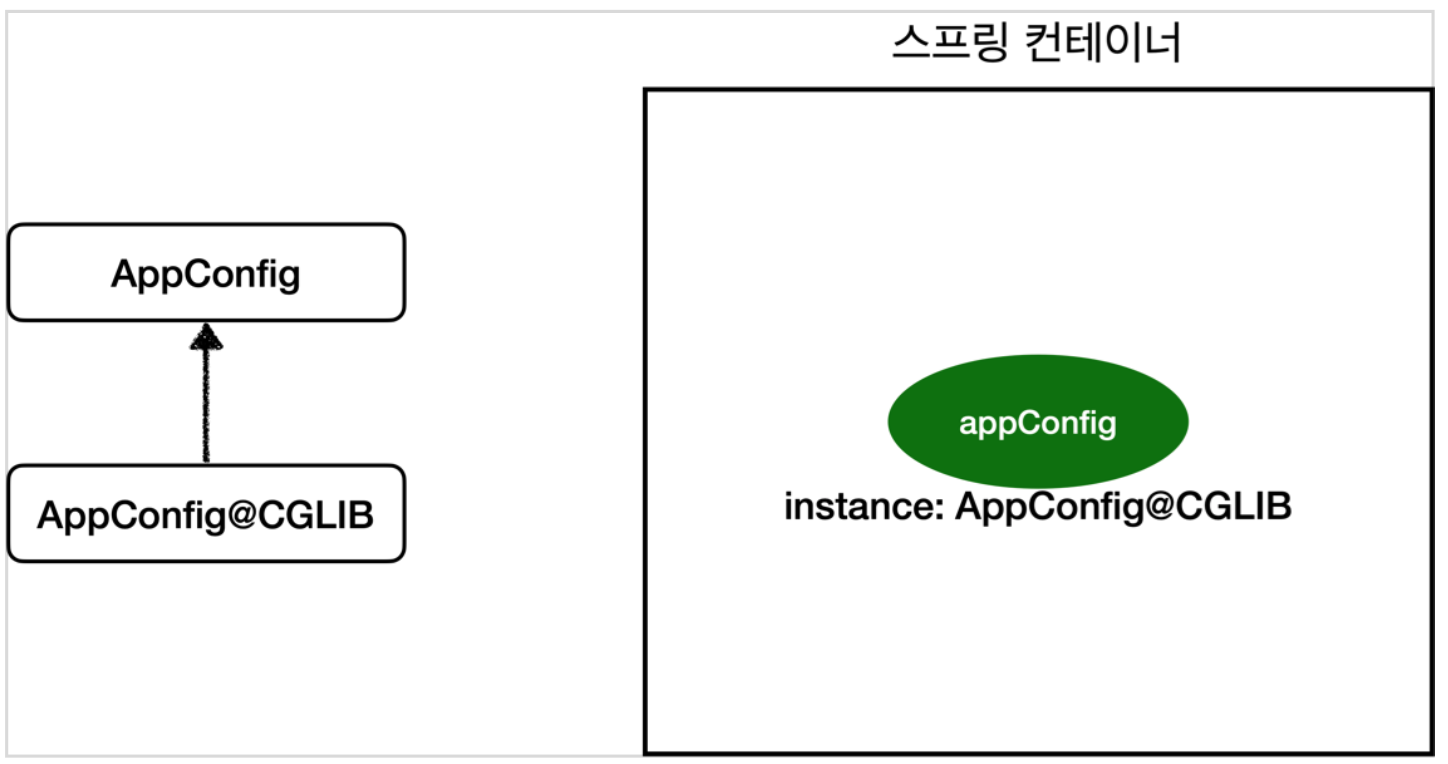
 기존의 AppConfig 를 살려두고 AutoAppConfig 클래스를 생성하였다.


컴포넌트 스캔을 사용하면 @Configuration이 붙은 설정 정보도 자동으로 등록되기 때문에 AppConfig도 함께

등록되게 되므로 excludeFilters를 이용하여 컴포넌트 스캔 대상에서 제외하였다.


컴포넌트 스캔을 사용하려면 먼저@ComponentScan을 설정 정보에 붙여주면 된다.


기존에 AppConfig와는 다르게 @Bean으로 등록한 클래스가 하나도없다.


package hello.core.member;

import org.springframework.stereotype.Component;

import java.util.HashMap;
import java.util.Map;

@Component
public class MemoryMemberRepository implements MemberRepository{

    private static Map<Long, Member> store = new HashMap<>();

    @Override
    public void save(Member member) {
        store.put(member.getId(), member);
    }

    @Override
    public Member findById(Long memberId) {
        return store.get(memberId);
    }
}

MemoryMemberRepository에 @Component를 붙여준다.


package hello.core.discount;

import hello.core.member.Grade;
import hello.core.member.Member;
import org.springframework.stereotype.Component;

@Component
public class RateDiscountPolicy implements DiscountPolicy{

    private int discountPercent = 10;

    @Override
    public int discount(Member member, int price) {
        if(member.getGrade() == Grade.VIP){
            return price * discountPercent / 100;
        } else{
            return 0;
        }
    }
}
package hello.core.member;

import org.springframework.beans.factory.annotation.Autowired;
import org.springframework.stereotype.Component;

@Component
public class MemberServiceImpl implements MemberService{

    private final MemberRepository memberRepository;

    @Autowired
    public MemberServiceImpl(MemberRepository memberRepository) {
        this.memberRepository = memberRepository;
    }

    @Override
    public void join(Member member) {
        memberRepository.save(member);
    }

    @Override
    public Member findMember(Long memberId) {
        return memberRepository.findById(memberId);
    }

    //Test
    public MemberRepository getMemberRepository() {
        return memberRepository;
    }
}

모든 구현클래스에 @Component 를 붙여줬다.


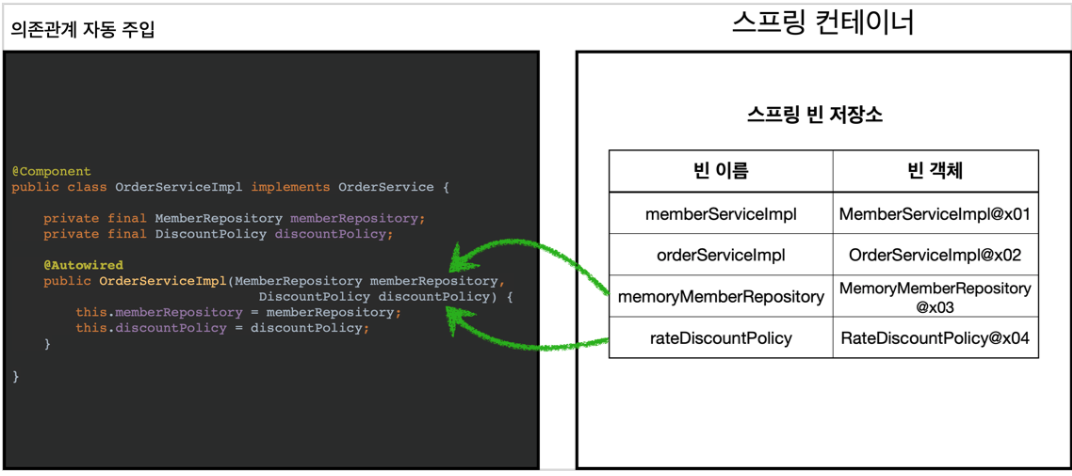
기존 AppConfig에서는 직접 @Bean으로 설정 정보를 작성, 의존관계 명시를 했다.


하지만 MemberServiceImpl 같은 경우에는 의존관계를 설정해주어야 하는데

이때 @Autowired로 생성자에 붙여주면 자동으로 의존관계를 주입해준다.

package hello.core.order;

import hello.core.discount.DiscountPolicy;
import hello.core.member.Member;
import hello.core.member.MemberRepository;
import hello.core.member.MemoryMemberRepository;
import org.springframework.beans.factory.annotation.Autowired;
import org.springframework.stereotype.Component;

@Component
public class OrderServiceImpl implements OrderService{

    private final MemberRepository memberRepository;
    private final DiscountPolicy discountPolicy;
    
    @Autowired
    public OrderServiceImpl(MemberRepository memberRepository, DiscountPolicy discountPolicy) {
        this.memberRepository = memberRepository;
        this.discountPolicy = discountPolicy;
    }

    @Override
    public Order createOrder(Long memberId, String itemName, int itemPrice) {
        Member member = memberRepository.findById(memberId);
        int discountPrice = discountPolicy.discount(member, itemPrice);

        return new Order(memberId, itemName, itemPrice, discountPrice);
    }

    //Test
    public MemberRepository getMemberRepository() {
        return memberRepository;
    }
}

OrderServiceImpl도 마찬가지로 @Component , @Autowired로 의존관계를 주입해준다.


package hello.core.scan;

import hello.core.AutoAppConfig;
import hello.core.member.MemberService;
import org.assertj.core.api.Assertions;
import org.junit.jupiter.api.Test;
import org.springframework.context.annotation.AnnotationConfigApplicationContext;

import static org.assertj.core.api.Assertions.*;

public class AutoAppConfigTest {

    @Test
    void basicScan(){
        AnnotationConfigApplicationContext ac = new AnnotationConfigApplicationContext(AutoAppConfig.class);

        MemberService memberService= ac.getBean(MemberService.class);
        assertThat(memberService).isInstanceOf(MemberService.class);
    }
}

그렇다면 테스트 코드를 작성 후 확인해보았다.


AnnotationConfigApplicationContext를 사용하는 것은 기존과 동일하다.

설정 정보를 AutoAppConfig 클래스를 넘겨준다.

실행해보자!

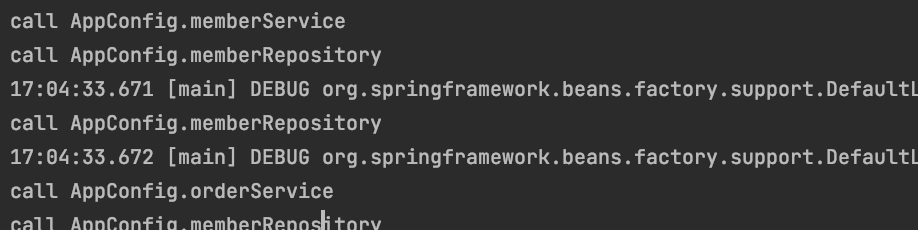
콘솔로그를 보면 ClassPathBeanDefinitionScanner라고 뜨는데 후보를 식별했다고 뜨는데 내가  @Component

애너테이션을 준 클래스들이 찍혀있다. @Autowired의 정보들도 로그에 뜨게된다.


1. @ComponentScan

https://www.inflearn.com/course/%EC%8A%A4%ED%94%84%EB%A7%81-%ED%95%B5%EC%8B%AC-%EC%9B%90%EB%A6%AC-%EA%B8%B0%EB%B3%B8%ED%8E%B8/lecture/55368?speed=0.75&tab=note

@ComponentScan 은 @Component가 붙은 모든 클래스를 스프링 빈으로 등록한다.


그런데 빈 이름을 주의하자.

이때 스프링 빈의 기본 이름은 클래스명을 사용하되 맨 앞글자만 소문자로 사용한다.

빈 이름 기본 전략 : MemberServiceImpl -> memberServiceImpl

빈 이름 직접 지정 : @Component("memberService")


2. @Autowired 의존관계 자동 주입

https://www.inflearn.com/course/%EC%8A%A4%ED%94%84%EB%A7%81-%ED%95%B5%EC%8B%AC-%EC%9B%90%EB%A6%AC-%EA%B8%B0%EB%B3%B8%ED%8E%B8/lecture/55368?speed=0.75&tab=note&mm=null

생성자에 @Autowired를 지정하면 스프링 컨테이너가 자동으로 해당 스프링 빈을 찾아서 주입한다.

찾을때는 타입으로 조회를 한다. 같은 타입이 있다면 주입을 해준다. 같은 타입이 여러개 있다면 충돌이 일어난다.


https://www.inflearn.com/course/%EC%8A%A4%ED%94%84%EB%A7%81-%ED%95%B5%EC%8B%AC-%EC%9B%90%EB%A6%AC-%EA%B8%B0%EB%B3%B8%ED%8E%B8/lecture/55368?speed=0.75&tab=note&mm=close

OrderServiceImpl같은 경우에는 생성자에 파라미터가 많다.

이런 경우에도 다 찾아서 자동으로 주입해준다.(타입으로 탐색)

@Configuration과 바이트코드 조작에 대해서 알아보았다.


스프링 컨테이너는 싱글톤 레지스트리다. 따라서 스프링 빈이 싱글톤이 되도록 보장해주어야한다.

근데 스프링이 자바 코드까지 어떻게 하기는 어렵다. 이전의 자바코드를 보면 분명 memberRepository가

3번 호출이 되어야하는것이 맞다. 


이 비밀은 @Configuration에 있다.


  @Test
    void ConfigurationDeep(){
        ApplicationContext ac = new AnnotationConfigApplicationContext(AppConfig.class);
        AppConfig bean = ac.getBean(AppConfig.class);

        System.out.println("bean = " + bean.getClass());
    }

테스트 코드를 하나 더 작성해보았다.

AppConfig자체도 빈에 등록되기때문에 이 빈의

클래스 타입을 보기위한 코드이다.


$$부터 이상한 출력이나온다 뭐지..?


순수한 클래스라면 

class hello.core.AppConfig 라고 떠야한다.


그런데 예상과는 다르게 클래스 명에 xxxCGLIB가 붙으면서 복잡해진 모습이다.

이것은 내가 만든 클래스가 아니라 스프링이 CGLIB라는 바이트코드 조작 라이브러리를 사용해서

AppConfig 클래스를 상속받은 임의의 다른 클래스를 만들고 그 다른 클래스를 스프링 빈으로

등록한 것이다.


https://www.inflearn.com/course/%EC%8A%A4%ED%94%84%EB%A7%81-%ED%95%B5%EC%8B%AC-%EC%9B%90%EB%A6%AC-%EA%B8%B0%EB%B3%B8%ED%8E%B8/lecture/55366?speed=0.75&tab=note

스프링이 AppConfig를 상속받는 다른 클래스를 만들고

그애를 스프링 빈으로 등록한 것!! 그 임의의 클래스가 바로

싱글톤이 보장되도록 해준다. 


@Bean이 붙은 메서드마다 이미 스프링 빈이 존재하면 존재하는 빈을 반환하고,

스프링 빈이 없으면 생성해서 스프링 빈으로 등록하고 반환하는 코드가 동적으로 만들어진다.

덕분에 싱글톤이 보장이된다.


@Configuration은 안붙여도 @Bean만 적용하면 어떻게될까?


@Configuration을 붙이면 바이트코드를 조작하는 CGLIB 기술을 사용해서 싱글톤을 보장하지만

만약 @Bean만 적용하면 어떻게 될까?


@Configuration 을 주석처리하고 이전의 테스트 코드를 돌려보았다.


그렇게 하니 아래와같이 memberRepository가 3번 호출되고

실제 빈에 AppConfig 자체가 등록되었다.


@Bean 만 사용해도 스프링 빈으로 등록되지만, 싱글톤을 보장하지 않는다.

크게 고민할 것없이 스프링 설정 정보는 항상 @Configuration을 사용하면 된다.

+ Recent posts